Current Lab
How does current move through a circuit?
In this Investigation, you will:
- Measure and compare current at different points in a circuit.
- Compare current in circuits with one and two bulbs.
Why does a bulb light? When you put a battery in a circuit, electric current flows through the wires and makes things happen. The current carries energy from the battery to a bulb or motor. You can increase the amount of energy in two ways. The higher the flow of current, the more the energy can be carried. The higher the voltage, the more energy can be carried by the same amount of current.
Safety Tips: Be careful working with batteries. If they are damaged, return them immediately to your teacher.
If a battery or wire gets hot, disconnect the circuit and ask your teacher for help.
Safety Tips: Be careful working with batteries. If they are damaged, return them immediately to your teacher.
If a battery or wire gets hot, disconnect the circuit and ask your teacher for help.
BUILDING TEST CIRCUIT#1
 Test Circuit #1
- Gather the following materials: electrical meter and its two test leads, a battery and battery holder, a bulb and bulb holder, and two connectors.
- Build test circuit 1 with one battery and battery holder, one bulb and bulb holder, and two connectors, as shown in the schematic at right. There are two points marked on the schematic, A and B, which is where the connectors are attached to the bulb holder. Make sure that you can easily identify these points in your circuit.
MEASURING CURRENT THROUGH TEST CIRCUIT #1
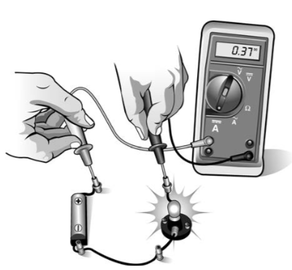
To measure current, the meter must be placed IN the circuit so the current has to flow through the meter. Follow the instructions below carefully.
- Connect the two meter leads to the meter as shown right.
- Set the meter to measure DC current (A on the dial).
- Disconnect the wire between the positive terminal of the battery and the bulb holder.
- Place the red positive lead of the meter on the wire attached to the positive terminal of the battery.
- Place the black negative lead of the meter on the wire attached to the bulb holder. You should now have a complete circuit. The bulb should light and you should get a reading on the meter.
- Record the current at point A. (Refer to previous diagram)
- Predict what the current at point B will be. Record your prediction.
- Following the same procedure you did for point A, use your meter to measure current at point B. The positive lead of the meter should be closest to the positive battery terminal, and the negative lead of the meter should be closest to the negative battery terminal.
- Record the current at point B. (Refer to previous diagram)
- Remove the meter and reconnect the circuit. Leave it connected while you complete part 3.
BUILDING TEST CIRCUIT #2
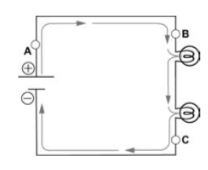
1. Gather the following additional materials: one battery and battery holder, two bulbs and bulb holders, and three connectors.
2. Build the circuit in the diagram on the left. Make sure that you can easily identify points A, B, and C where the connectors are attached.
2. Build the circuit in the diagram on the left. Make sure that you can easily identify points A, B, and C where the connectors are attached.
COMPARING TEST CIRCUITS #1 and #2
Compare the brightness of the bulbs in test circuits 1 and 2. Record your observations and disconnect test circuit 1.
MEASURING CURRENT THROUGH TEST CIRCUIT #2
- Using the same procedure you followed in part 2, measure and record current at point A.
- Predict what the current will be at points B and C.
- Using the same procedure you followed in part 2, measure and record current at points B and C.
DATA
Copy the following table into your notebook.
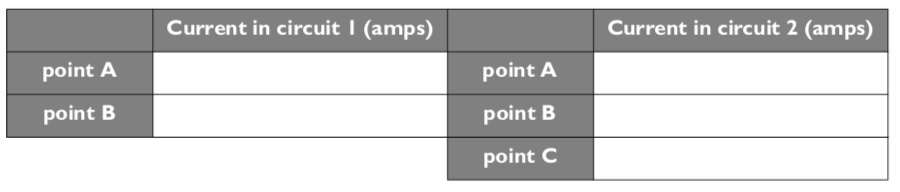
Transfer all your results for circuit 1 and circuit 2 into the table above. Compare the current readings in the two circuits.
When done, log in to Edmodo and complete the analysis.